developer0809.tistory.com/92?category=895002
[#. Django] Django(Rest Framework) + React로 프로젝트 시작하기1
데이터 시각화를 위해 Python을 사용해야 하는데 그 중에서도 Django framework를 사용하고 싶다 또한 Back/Front 분리를 위해 front는 React를 사용하려고 한다 React에서는 axios로 Django로부터 Rest API로 데..
developer0809.tistory.com
이전 글에서 세팅해둔 상태에서 이어서 진행하겠다
django react 프로젝트에서 로그인/회원가입을 구현해 보자
처음에는 아래 글을 보고 djangorestframework-jwt를 이용해서 로그인/회원가입을 구현하려고 했으나
더이상 지원하지 않는다는 글을 보고 다른 방법으로 구현했다
medium.com/@dakota.lillie/django-react-jwt-authentication-5015ee00ef9a
Django & React: JWT Authentication
Recently I’ve been building an app using a combination of React for the frontend and Django for the backend. I wasn’t previously all too…
medium.com
① backend/settings.py
INSTALLED_APPS = [
    'rest_framework.authtoken',
    'rest_auth',
    'rest_auth.registration',
    'django.contrib.sites',
    'allauth',
    'allauth.account',
]

AUTH_USER_MODEL = 'mall.CustomUser'

EMAIL_BACKEND = 'django.core.mail.backends.console.EmailBackend'

AUTHENTICATION_BACKENDS = (
	"django.contrib.auth.backends.ModelBackend",
    "allauth.account.auth_backends.AuthenticationBackend",
)

SITE_ID = 1

ACCOUNT_EMAIL_REQUIRED = True

ACCOUNT_USERNAME_REQUIRED = False

ACCOUNT_SESSION_REMEMBER = True

ACCOUNT_AUTHENTICATION_METHOD = 'email'

ACCOUNT_UNIQUE_EMAIL = True

# Rest Framework config. Add all of this.
REST_FRAMEWORK = {
    'DATETIME_FORMAT': "%m/%d/%Y %I:%M%P",
    'DEFAULT_AUTHENTICATION_CLASSES': [
        'rest_framework.authentication.TokenAuthentication',
    ],
}
② backend/urls.py
urlpatterns = [
	path('api/v1/mall/', include('mall.urls')),
]
③ mall/admin.py
from django.contrib.auth import get_user_model
from django.contrib.auth.admin import UserAdmin
from .forms import CustomUserChangeForm, CustomUserCreationForm
from .models import CustomUser

class CustomUserAdmin(UserAdmin):
    add_form = CustomUserCreationForm
    form = CustomUserChangeForm
    model = CustomUser
    list_display = ['email']
④ mall/forms.py
from django import forms
from django.contrib.auth.forms import UserChangeForm, UserCreationForm
from .models import CustomUser

class CustomUserCreationForm(UserCreationForm):
    class Meta:
        model = CustomUser
        fields = ('email', )
class CustomUserChangeForm(UserChangeForm):
    class Meta:
        model = CustomUser
        fields = UserChangeForm.Meta.fields
⑤ mall/models.py
from django.contrib.auth.models import AbstractUser

class CustomUser(AbstractUser):
    # Any extra fields would go here
    def __str__(self):
        return self.email
⑥ mall/serializers.py
from .models import CustomUser

class UserSerializer(serializers.ModelSerializer):
    class Meta:
        model = CustomUser
        fields = ('email', 'last_login', 'date_joined', 'is_staff')
⑦ mall/urls.py
from django.urls import include, path

urlpatterns = [
    path('auth/', include('rest_auth.urls')),
    path('auth/register/', include('rest_auth.registration.urls'))
]
⑧ migration, server 실행
python3 manage.py makemigrations
python3 manage.py migrate

python3 manage.py runserver
⑨ postman으로 확인
chrome.google.com/webstore/detail/postman/fhbjgbiflinjbdggehcddcbncdddomop?hl=ko
Postman
POSTMAN CHROME IS DEPRECATED DOWNLOAD THE UPDATED POSTMAN NATIVE APPS Postman Chrome is deprecated and is missing essential, new…
chrome.google.com
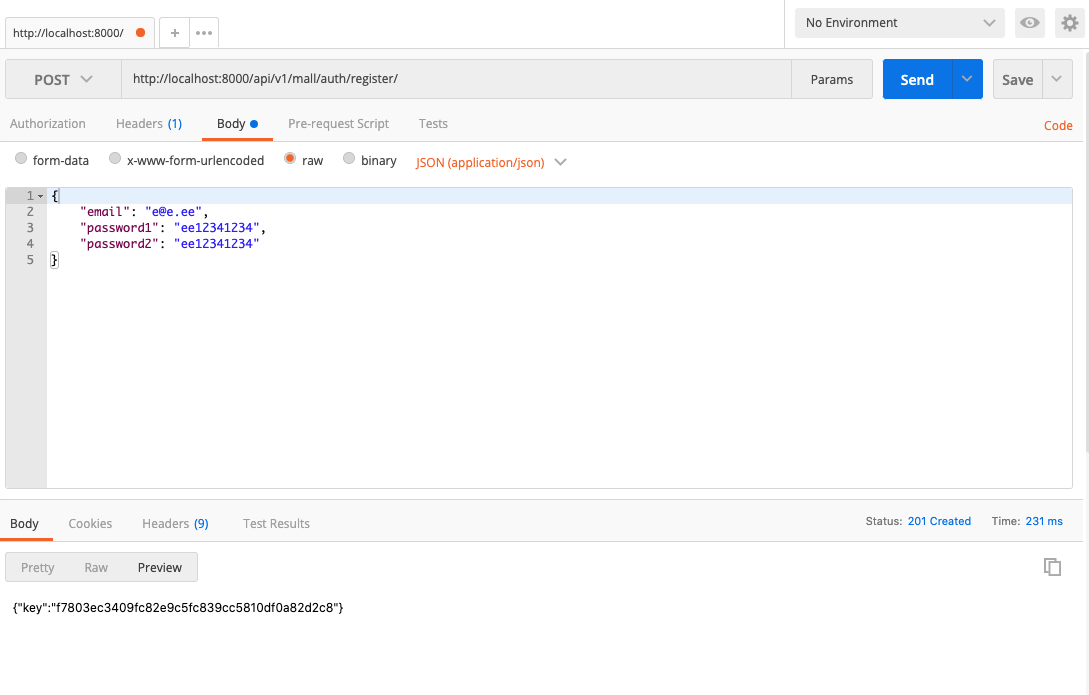
⑴ register 회원가입 요청
POST
http://localhost:8000/api/v1/mall/auth/register/
Body => raw => JSON(application/json)
임의로 계정, 비밀번호 입력
{
	"email": "e@e.ee",
	"password1": "ee12341234",
	"password2": "ee12341234"
}

SEND 버튼을 클릭하면 key를 얻을 수 있다
⑵ logout 로그아웃
POST
http://localhost:8000/api/v1/mall/auth/logout/
Headers => Key/value 입력
Key: Authorization
Value: 회원가입 후 얻은 key값
넣은 후 Send 버튼을 클릭하면 로그아웃 된다

아래 사이트를 참고했다
medium.com/dev-genius/django-react-authentication-part-1-d351726b284d
Django + React Authentication : Part 1
Using Django, Django Rest Framework, React, and React Router Dom to create a simple authentication system.
medium.com


